Introduction
In this post, we will see how to install Informatica Powercenter 10.2 on Oracle Linux 8. It is meant to help beginners to have the tool installed and start exploring it. When one gets the desire to learn more about the tool, it may be a little bit confusing to know where to start.
When searching for “How to install Informatica?” on any search engine, we can quickly get overwhelmed and lost in the results we get! However, we can find real pearls in all that. We only need to know where to look, be patient, have time to go through it, and assemble the puzzle.
To start, some knowledge of Linux basic commands and how to create and manage databases are needed. Also, having a basic understanding of Informatica architecture is necessary.
Hence, I will make sure to walk you through the installation process by giving links to useful materials and tutorials. I will not go into detailed step-by-step installation because the post would be too long. Instead, I will invite you to use some demo videos and tutorials that already provide good explanations of some installation steps. We do not have to reinvent the wheel! However, I will add directives to assemble the different pieces. I will also point out some errors that may occur and how to fix them.
General steps
The first major step, and probably the most challenging in the installation process, is to set up a database that will act as the repository of the Informatica services’ metadata. The types of databases supported are:
- IBM DB2 UDB.
- Microsoft SQL Server.
- Oracle.
- Sybase ASE.
We will install Oracle Database 19c. Then, we will create a database and a user with DBA privileges. These steps, in my opinion, are the hardest ones in Informatica installation. You can try other databases such as MS Server 2019. In this case, the database should be installed on another machine with Windows OS or in a VM.
You can install an RDBMS to access the database. We will use SQL Developer. This tool will need a JDK.
The second big step is to install the Informatica server. Apart from the huge size of the files needed and some settings of environment variables, the installation of this tool is relatively easy. It will ask for access to the database created in the first step.
Why Oracle Linux 8?
After a successful installation of Informatica 9.6 on a Windows machine, I had several attempts to install the 10.2 version on Linux platforms.
First, I installed Debian. However, I got a ‘Could not perform a check of physical memory’ issue while trying to install Oracle Database 19c. Running the check would notify me that my machine didn’t match the requirements, but still, I was able to continue the installation process by choosing to ignore it. But, few steps farther, I ran into the above-mentioned problem. it seemed that the check was mandatory and I could not go further in my installation.
As an alternative, I tried installing the database on a VM with Oracle Linux 8. My goal was to run Powercenter under the Debian physical machine and connect it to the database running in the VM. I ran into big performance issues.
So, I finally installed Oracle Linux 8 directly on my machine. And performed the installation successfully.
Oracle database 19c Installation and configuration
I recommend first reading this Oracle Base article. It explains in a detailed way the steps of the installation. Then watch this well-structured video, from the ICyb3r Youtube channel, to do the installation. I suggest writing down all the useful information such as paths, database users, and passwords.
If your machine architecture is 64 bits, you can download Oracle Database 19.c from here:
- Choose the Zip file : LINUX.X64_193000_db_home.zip,
- You will need to create an Oracle account to download it. We will need the account later to get Informatica packages.
Note:
At 44:17 in the ICyb3r’s video, a listener should be created. I suggest that you check the Create a new listener box and name it. You can leave the port at 1521.
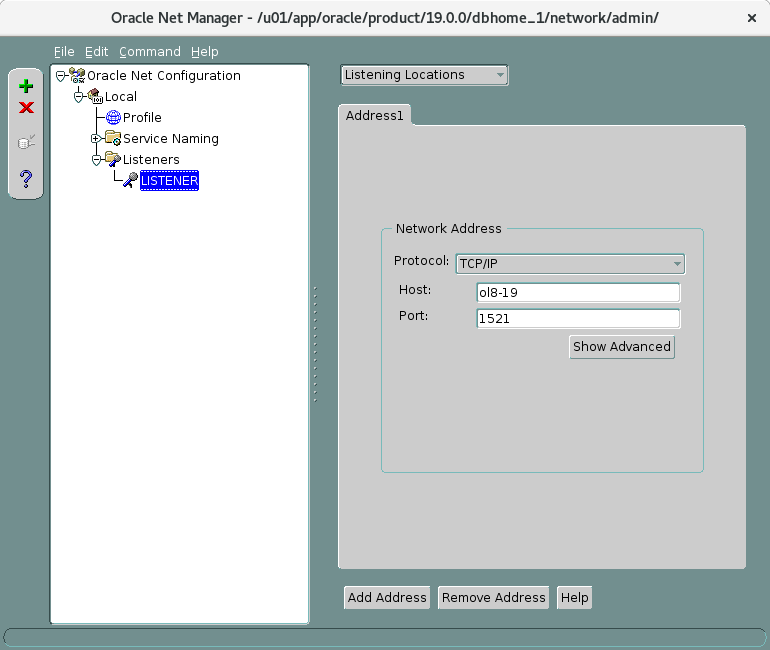
If you haven’t created the listener using the above method, you can, at any time, open the Net Manager and create one:
- In the Terminal, type:
$netmgr - A window will open. Navigate to ‘Listners’ folder as shown below and click on Create (the green ‘+’ button on the left). Enter a name and click Ok.
- Choose ‘Listening Location’ then click ‘Add Address’:
- Choose TCP/IP Protocol,
- Type the host name. It should be your machine name (check /etc/hostname), mine is ol8-19,
- Port: 1521.
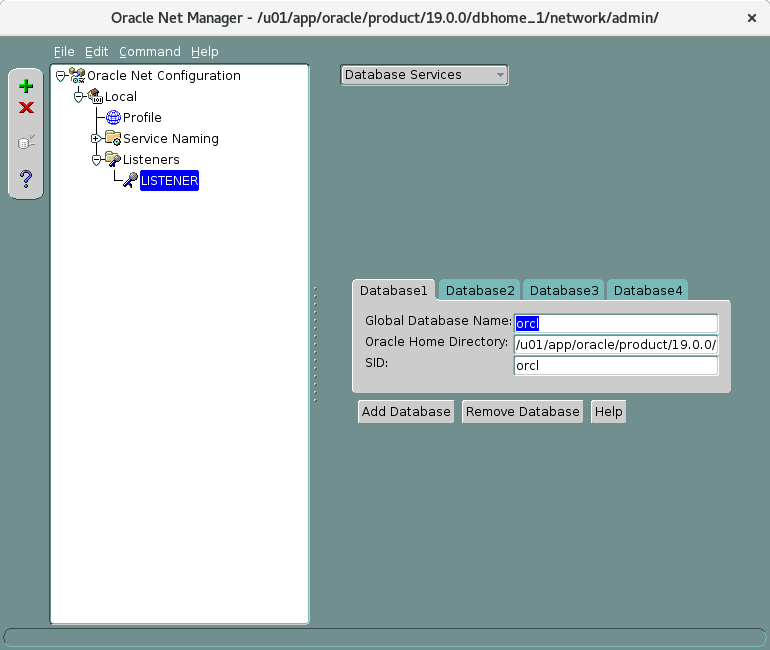
- Now, choose ‘Database Services’, and:
- Enter the Global Database Name and SID. Check the Home Directory of Oracle,
- In the Menu, click File > Save Network Configuration. And close the window.
Users creation
- In ICyb3r’s video, a container database is created with a pluggable database (PDB) named
pdbis added. We will create users under thepdbdatabase since it is not recommended to add users directely to the container. Read more about PDBs here. To add the users:- Check if the listner is up and running:
$ lsnrctl status - Start the listner if needed:
$ lsnrctl start
- connect to SQL Plus:
$ Sqlplus / as sysdba - Startup the database if it is in an idle state:
sql> startup - or by runnig the script if you choose to create it as shown in the Oracle Base article:
$ ./oracle_home/scripts/start_all.sh - Switch to the
pdbto create the users:- Check the current container:
sql> SHOW con_name;(it should be at CDB)
- if
pdbis not open, then run:sql> ALTER pluggable database pdb open; - Switch to the
pdb:sql> ALTER session set container=pdb; - Check again the current container.
- Create two users (save somewhere the names and passwords):
- Domain Repository user creation :
sql> CREATE USER infa_domain IDENTIFIED BY pwd1; - Model Repository user creation:
sql> CREATE USER infa_mrs IDENTIFIED BY pwd2;
- Domain Repository user creation :
- Grant DBA privileges to the two users:
sql> GRANT DBA to infa_domain;sql> GRANT DBA to infa_mrs;
- Check the current container:
- Check if the listner is up and running:
Up to now, we have created a database (two actually: a container and a pluggable), two users, and a listener. The next step will be to create the Informatica server. But, before that, I suggest you install SQL Developer and connect to the Database to check if everything is working fine.
SQL Developer installation
First, we need to install a JDK:
- Install a JDK 8 or 11 (11 with this command):
$ sudo yum install java-11-openjdk-devel
- Check installation :
$ java --version
- Find and save the JDK installation path:
$ which javaor$ whereis java
Now, we can download SQL Developer (RPM for Linux) by following these steps:
- In the terminal, go to the folder where you have downloaded the package and install it by running:
$ sudo rpm -Uhv sqldeveloper-X-1.noarch.rpm. Be sure to change the ‘X’ accordingly. - Navigate to the installation folder (/opt/ in my case):
$ cd /opt/sqldeveloper - Run the script to launch the tool:
$ ./sqldevloper.sh - Enter Java path if asked. The tool will open.
Connection to the database using SQL Developer
Once the tool is open, click on the green ‘+’ button on the top left of the Connections pane to add a connection. the next window opens:
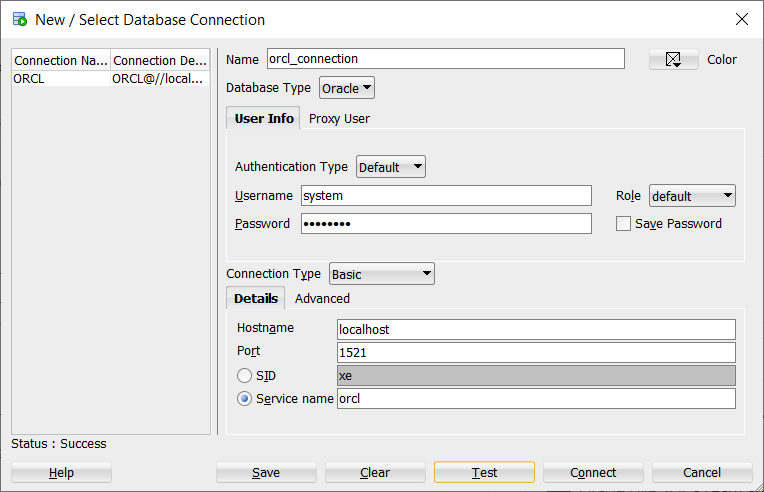
- Give a name to the connection
- user name of the database: system,
- use the password created during configuration,
- Hostname: localhost (for local connection) or the name of your machine (if accessed remotely)
- give the Service Name or the database SID. Here I chose orcl (the CDB).
- Check the connection with Test button. Then click Connect if the test succeded.
You can also create a connection to pdb database for our users (infa_domain and infa_mrs)…etc.
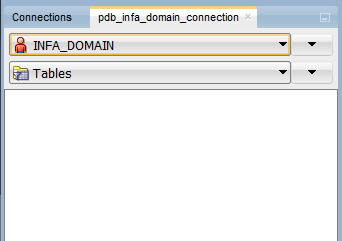
As you can see below there is no table created and accessible yet via the Infa_domain user.
Since we installed sample schemas, you can unlock the users such as ‘HR’ user and practice querying the database.
Installation of Informatica Server
Now, we can proceed to Informatica Server installation.
Download Informatica Powercenter 10.2
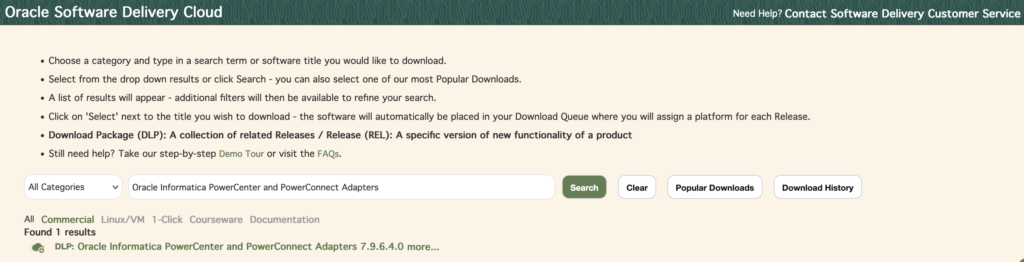
To start, we need to download the different packages from Oracle eDelivery. Same as Oracle Database 19c download, we will need to log in (use the same user name and password) or create an account to be able to access the website.
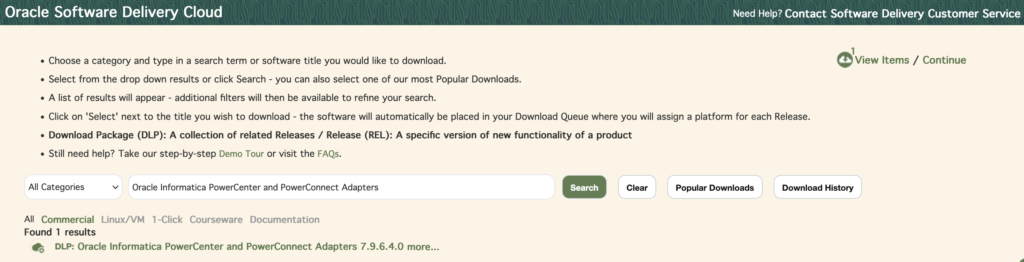
Search for Oracle Informatica Powercenter and Powercenter Adapters.
Click on the result found. The tool will be added to the item list. Then click on Continue on the right top.
Specify your machine platform (Linux x86-64 in my case). Then click continue.
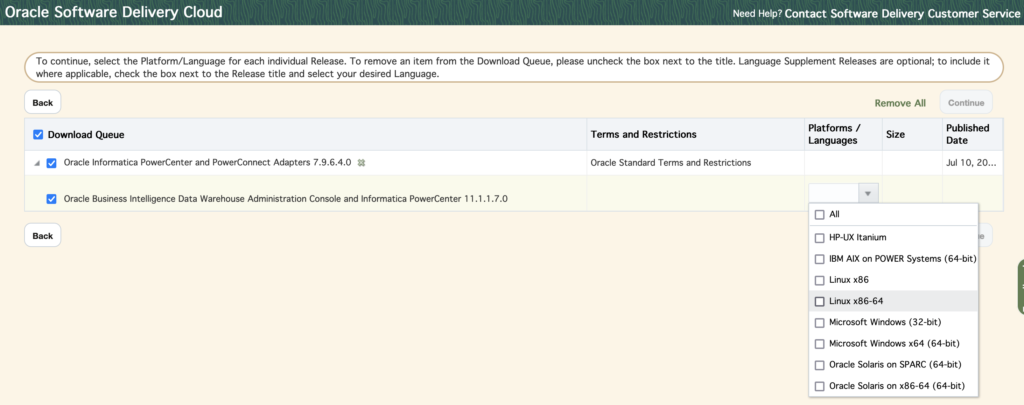
Review and accept the license agreement and click on Continue again. On the next page, you will see a pre-checked list of different versions of Informatica software (about 61 GB). Uncheck all from the root then check only the files corresponding to ‘PowerConnect Adapters (10.2.0) for Linux x86-64 (64-bit)’. There are two files:
-
V082521-01_1of2.zipof 9.4 GB containing the Informatica Server installer. -
V082521-01_2of2.zipof 5.6 GB containing Informatica Client installer and a key lience file.

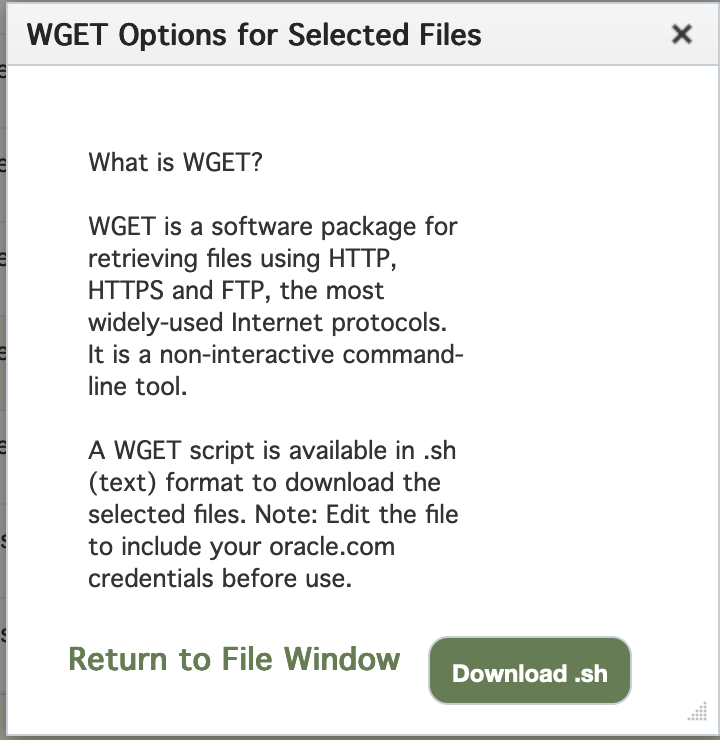
Sometimes the Download button does not work. On the Linux platform, I got a message informing me that I do not have a compatible platform. In this case, choose the WGET Option, download the .sh script, give it the execution permission ($ chmod +x wget.sh) and run it. It will take time to download. Unzip the two files after the download.
Installation of Informatica
Before starting the installation, make certain to:
- unset DISPLAY environment variable:
$ unset DISPLAY, - Setting the LANG environment variables:
$ export LANG=en_US.UTF-8.
For the installation, I suggest following along with this video. You will find all the needed steps.
- At
5:15in the video, you will need to specify the path to the license key present in fileV082521-012of2.zip(named Oracle_America_Inc-OEM-V102-Prod_xxxx_xxxx.key), - At
6:50(step 5B of 9) and9:40(step 7A of 9) in the video, we will need the database users already created from the previous steps, - Make sure that your
pdbdatabase is open and accessible because the installer will need to connect to it and create the needed tables and metadata, - Save somewhere all the passwords you have created!
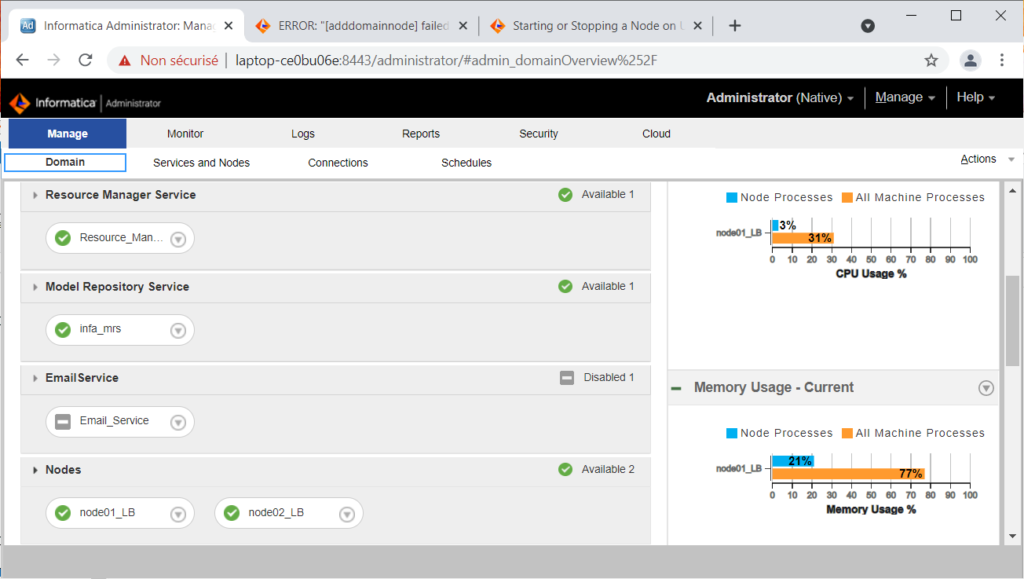
Connection to Administrator Console
After the installation, open your browser:
- Enter
<hostname>:port_nogiven at the end of the installation. If the login page did not appear then wait for some minutes. If still didn’t connect then try starting the informatica services using:$ <Infomatica_home>/tomcat/bin/infaservice.sh startup- Ensure that the
pdbdatabase is open and acccessible.
- Enter the user name and password (
Administrator, if you followed exactly the steps in the video).You will see the interface. As you can see from the picture below, I have the infa_mrs service up and running. You can notice that I have tow available nodes. That is because I have joined a nother node to my domain. This will be discussed in another post.
Note:
In my first installation, I wasn’t able to connect to the Admin console due to some errors during the creation of the domain. So, I uninstalled Informatica and installed it again as proposed in this discussion.
To uninstall Informatica:
- make sure to stop the informatica services before the uninstallation,
- Run
$ ./<Informatica_home>/Uninstaller_Server/uninstaller.sh,
Conclusion
In this post, we have seen how to install Informatica 10.2 on Oracle Linux 8. The next step will be to join a second node to the domain.